
 Scrapoxy
Scrapy Integration

This tutorial uses the Python web scraping framework Scrapy.
Step 1: Install the framework
pip install scrapy scrapoxyStep 2: Retrieve project credentials
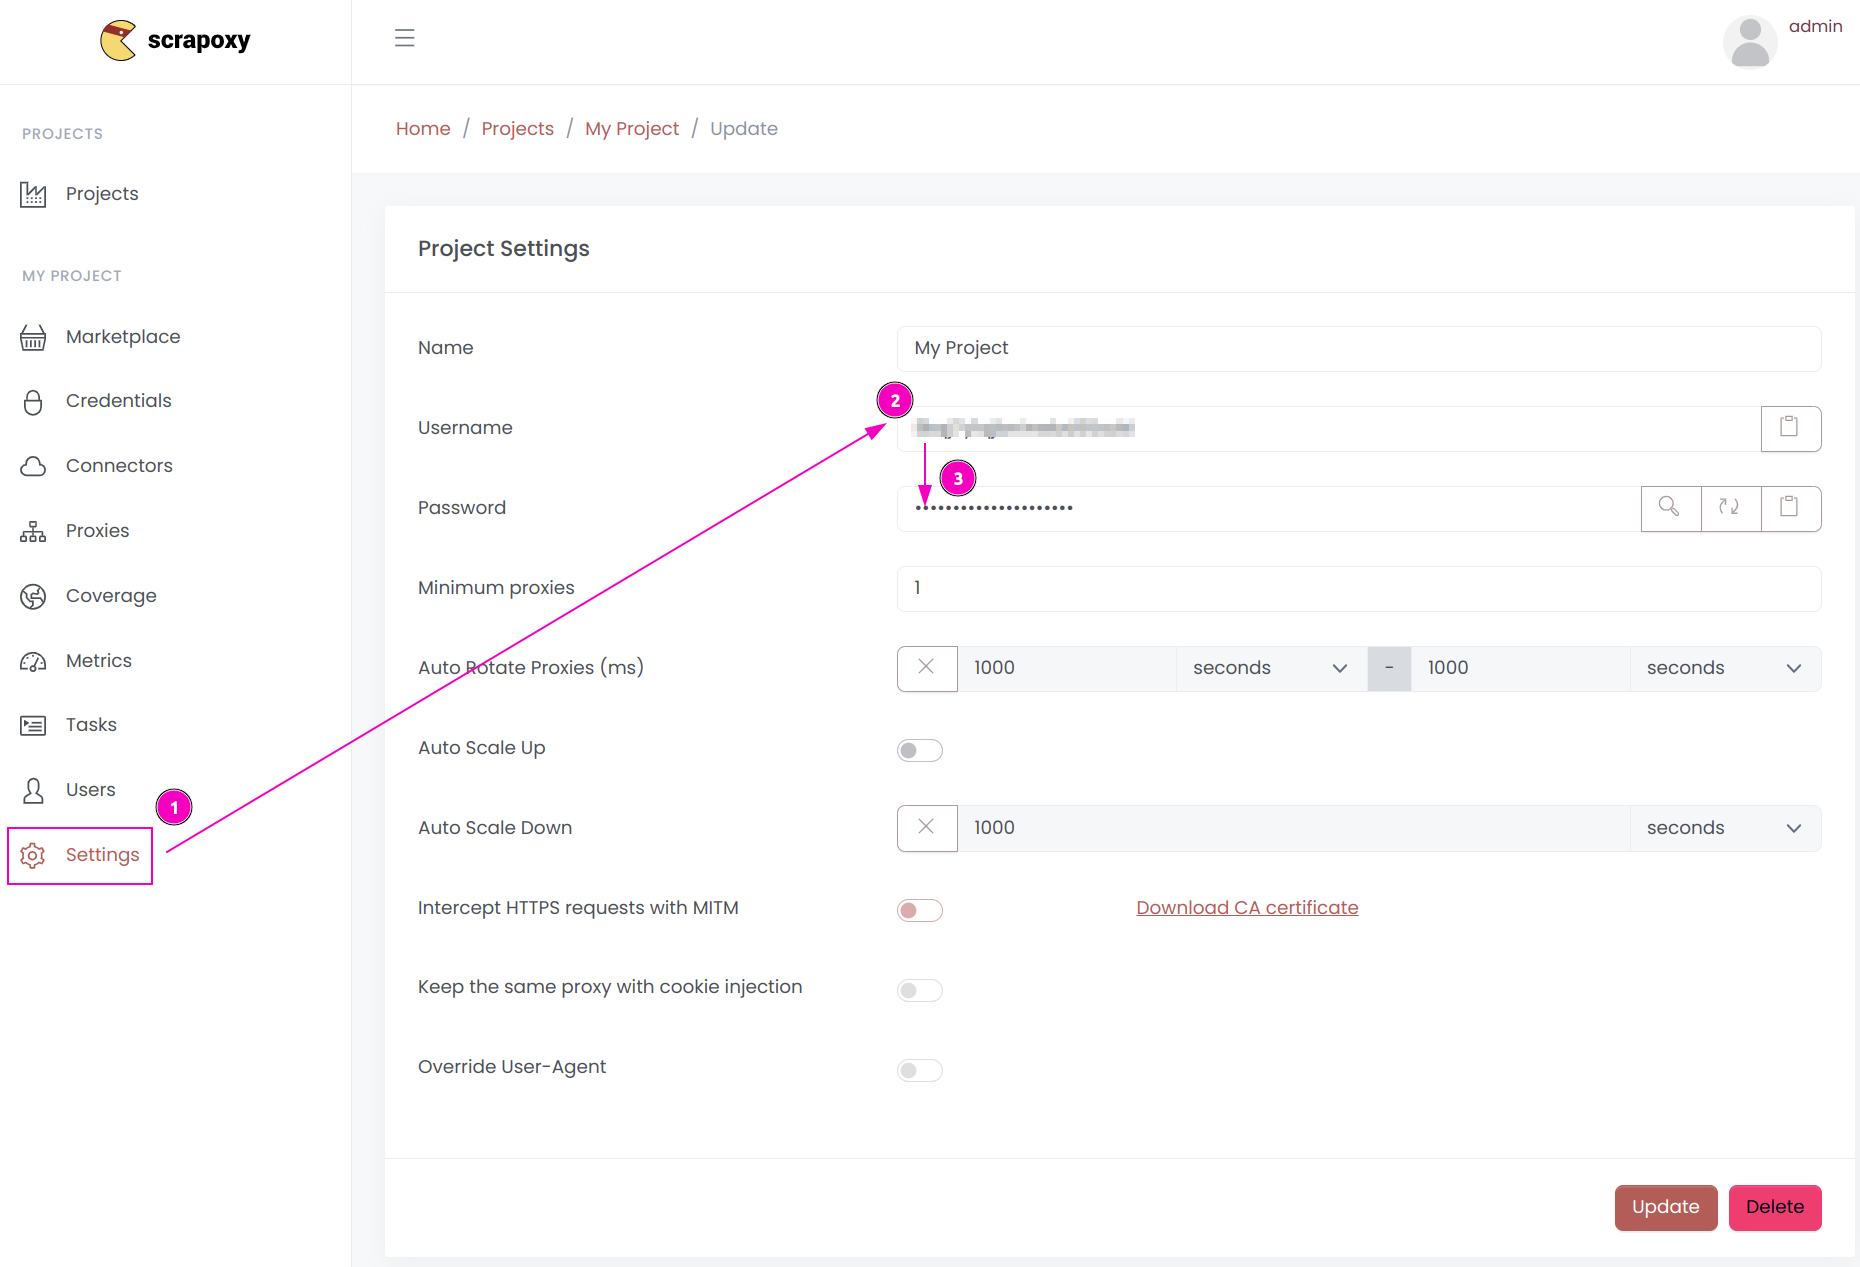
- Open Scrapoxy User interface, and go to the project
Settings; - Remember the project's
Username; - Remember the project's
Password.
Step 3: Create a new project
Create a new Scrapy project:
scrapy startproject myproject
cd myproject
And add a new spider:
scrapy genspider myspider mydomain.comStep 4: Add Scrapoxy usage
Edit myproject/settings.py and modify the following lines:
ADDONS = {
    'scrapoxy.Addon': 100,
}

SCRAPOXY_MASTER = "http://localhost:8888"
SCRAPOXY_API = "http://localhost:8890/api"
SCRAPOXY_USERNAME = "USERNAME"
SCRAPOXY_PASSWORD = "PASSWORD"
Replace USERNAME and PASSWORD by the credentials you copied earlier.
Step 5: Auto-scale the scraping session
Scrapy can scale and waits until enough proxies are online before starting a scraping session.
To modify this behavior, update myproject/settings.py with the following configuration:
SCRAPOXY_WAIT_FOR_PROXIES = True
SCRAPOXY_MODE_START = 'HOT'
SCRAPOXY_MODE_RESTART = 'HOT'
SCRAPOXY_MODE_STOP = 'OFF'
SCRAPOXY_PROXIES_CHECK = 5  # Default is 10 seconds
Session Start (SCRAPOXY_MODE_START)
When set to HOT, Scrapoxy launches the necessary proxy instances as soon as a scraping session begins. Alternative values include WARM, COLD, or None to disable automatic startup.
Session Restart (SCRAPOXY_MODE_RESTART)
This setting forces Scrapoxy to adjust the current mode to the specified one (HOT, WARM, COLD, or None to disable) if a mismatch is detected during the session.
Session Stop (SCRAPOXY_MODE_STOP)
With this parameter set to OFF, Scrapoxy shuts down proxy instances at the end of the session.
The last setting is disabled by default since terminating instances while multiple spiders are active can be risky; in such cases, the auto-scale down feature of Scrapoxy is recommended (see Auto Scale Up).
Step 6: Remove blacklisted instances (optional)
Scrapy uses Scrapoxy's API to kill blacklisted instances.
Edit myproject/settings.py and add the following lines:
SCRAPOXY_WAIT_FOR_PROXIES = True  # if not already set
SCRAPOXY_BLACKLIST_ENABLE = True
SCRAPOXY_BLACKLIST_HTTP_STATUS_CODES = [400, 429, 503]
SCRAPOXY_BLACKLIST_FORCE = True
SCRAPOXY_BLACKLIST_SLEEP = [5, 10]  # Optional (default value is [60, 170])
This requires enabling MITM in Scrapoxy.
The HTTP status codes to be blacklisted are defined in SCRAPOXY_BLACKLIST_HTTP_STATUS_CODES.
When a blacklisted instance is encountered, Scrapy pauses for a random duration within the range specified by SCRAPOXY_BLACKLIST_SLEEP (in seconds). A fixed delay can also be set by providing a single integer value.
If SCRAPOXY_BLACKLIST_FORCE is set to True, the middleware will automatically remove the instance.
The last feature is available only for connector types that support it, as indicated by a Trash icon in the Scrapoxy UI.
Step 7: Sticky session (optional)
Scrapy can use the same proxy instance for a set of chained requests.
Edit myproject/settings.py and add the following lines:
SCRAPOXY_STICKY_ENABLE = TrueThis middleware requires enabling MITM in Scrapoxy.
Step 8: Render page with Splash using Scrapy and Scrapoxy (optional)
Before using Splash, follow the Splash integration guide.
Afterward, install the library:
pip install scrapy-splashThen, add the following lines to settings.py:
SPLASH_URL = "http://localhost:8050"

DOWNLOADER_MIDDLEWARES = {
    "scrapy_splash.SplashCookiesMiddleware": 723,
    "scrapy_splash.SplashMiddleware": 725,
    "scrapy.downloadermiddlewares.httpcompression.HttpCompressionMiddleware": 810,
}
SPIDER_MIDDLEWARES = {
    "scrapy_splash.SplashDeduplicateArgsMiddleware": 100,
}

DUPEFILTER_CLASS = 'scrapy_splash.SplashAwareDupeFilter'
HTTPCACHE_STORAGE = 'scrapy_splash.SplashAwareFSCacheStorage'
Here is an example of spider:
from scrapy import Spider
from scrapy_splash import SplashRequest

class SplashSpider(Spider):
    name = "splash"

    def start_requests(self):
        yield SplashRequest(
            "https://example.com",
            self.parse,
            args={
                "wait": 1,
                "proxy": "http://USERNAME:PASSWORD@HOST_IP:8888",
            }
        )

    def parse(self, response):
        print(response.body)
Replace USERNAME and PASSWORD with the previously copied credentials, and HOST_IP with the IP address of the machine running Scrapoxy.
Step 9: Integrate scrapy-impersonate (optional)
The library scrapy-impersonate is a Scrapy download handler. This project integrates curl_cffi to perform HTTP requests, so it can impersonate browsers' TLS signatures or JA3 fingerprints.
WARNING
Using this library to change the TLS fingerprint disables Scrapoxy's MITM functionality. Also, BlacklistDownloaderMiddleware and StickySpiderMiddleware do not work with scrapy-impersonate.
To use it, first install the package:
pip install scrapy-impersonateAnd add the following lines to settings.py:
TWISTED_REACTOR = "twisted.internet.asyncioreactor.AsyncioSelectorReactor"

DOWNLOAD_HANDLERS = {
    "http": "scrapy_impersonate.ImpersonateDownloadHandler",
    "https": "scrapy_impersonate.ImpersonateDownloadHandler",
}
Here is an example of how to use scrapy-impersonate:
class ExampleSpider(Spider):
    name = "example"
    allowed_domains = ["browserleaks.com"]

    def start_requests(self):
        yield Request(
            url="https://tls.browserleaks.com/json",
            dont_filter=True,
            meta={
                "impersonate": "chrome110",
            },
            callback=self.parse
        )
In this example, the request will emulate a Chrome 110 browser, but you have the flexibility to choose from many other useragents.
INFO
The middleware scrapoxy.ProxyDownloaderMiddleware is compatible with scrapy-impersonate. It will set the verify option to False and the proxy authentication.
Also, remember to turn off Intercept HTTPS requests with MITM:
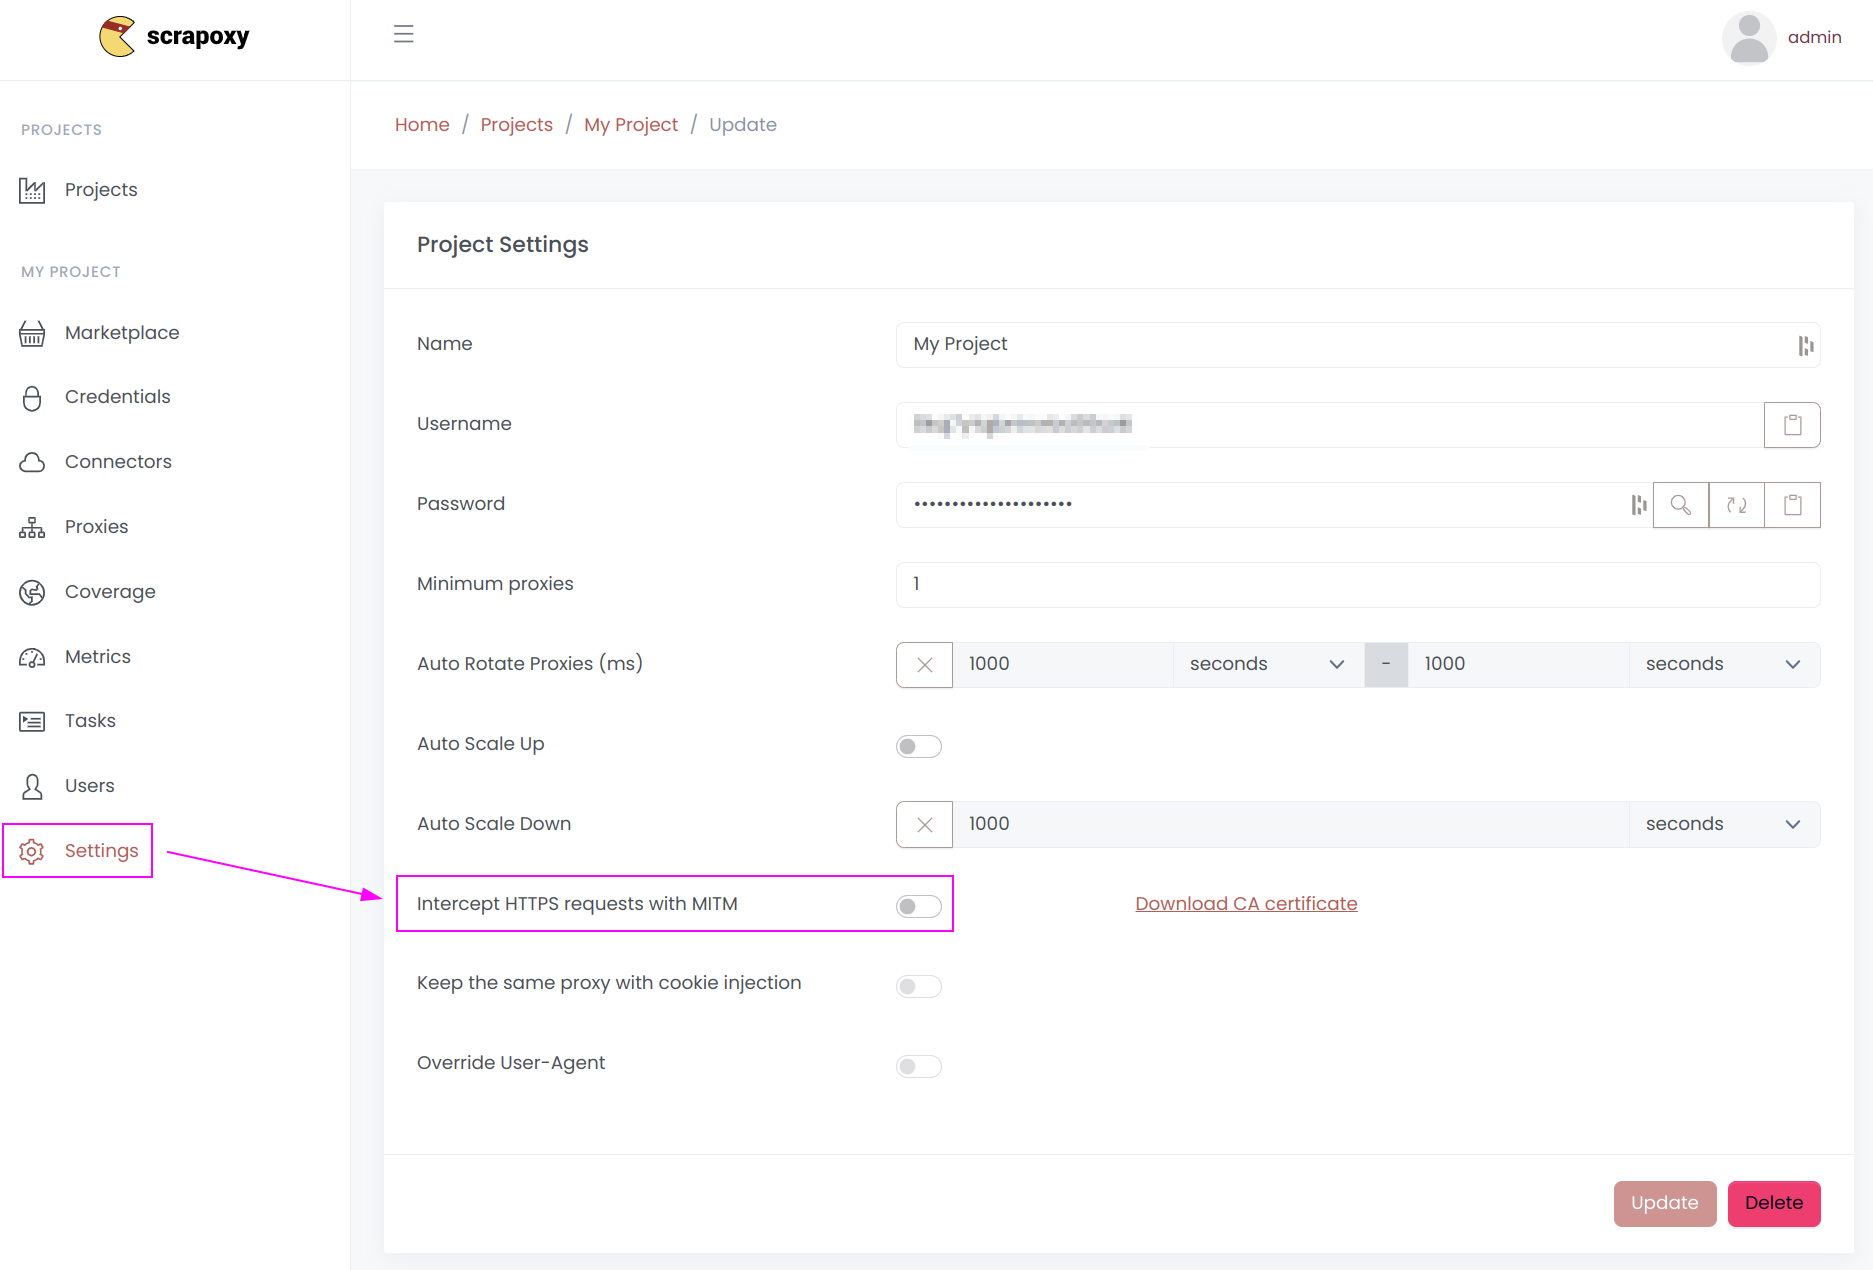
Otherwise, Scrapoxy will use a Node.js TLS fingerprint to connect to the website, bypassing the scrapy-impersonate TLS fingerprint.